For more information about the condition see my detailed article here.
Exercises are not a quick cure for PTTD. In fact you might find that your foot pain worsens slightly for a few weeks until your tendon gets used to them. Patience is required. The programme will usually need to done for at least 3 months and sometimes longer before you notice a big improvement.
 |
| Link to PTTD article |
Whilst doing these exercises there should be minimal pain or preferable no pain at all, otherwise they won't work and may just flare up the condition. You might need to do the exercises while wearing your medial arch support insoles if they help reduce the pain.
Use the table below to help keep pain at an acceptable level while you are exercising. Try to stay within the green or yellow boxes. If you start nudging into the red, then try reducing the amount of resistance or take less weight through your foot.
The exercises are designed to load the tendon progressively in baby steps over many weeks. Tendons have a slow response to healing but flare up quickly if pushed too hard and too fast. So be patient and keep within the green and yellow areas.
Exercise 1 - Graded Resistance
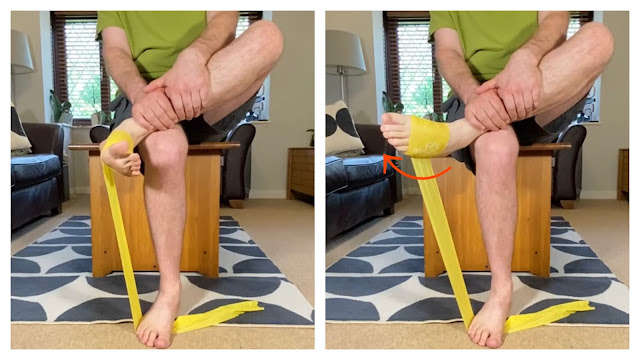
This exercise is done is sitting and uses a 1 meter length of resistance band. Use either or a light (usually yellow) or medium (usually red) strength resistance. The amount of resistance can be fine tuned by adding or reducing the amount of stretch.
Wrap one end of the band around your foot and secure the other end as shown below. Adjust the tension to suit your ability. The exercise involves slowly pointing your foot downwards and inwards.
Repeat 8 times and do 2 sets. The exercise should be pain free or with minimal pain. Adjust the resistant to suit you. Perform daily and slowly increase to 3 sets of 10-15 reps. Once you can do this, then slowly start increasing the resistance. You can do this exercise in either of the positions below, whichever is most comfortable for you.
 |
| Position 1 |
 |
| Position 2 |
Exercise 2 - Balance
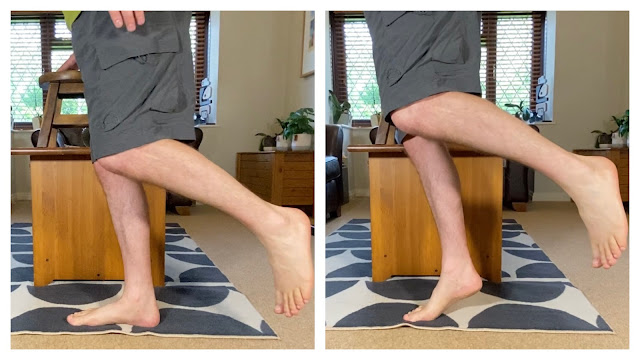
The tibialis posterior tendon has an important role in controlling your balance. This next set of exercises will challenge your balance progressively.
To start with, just try to balance on one foot for a few seconds. You should do this in bare feet unless you have very low arch or you are getting too much pain. Then, use your insoles in a pair of suitable sports shoes.
 |
| Single foot balance Balance with reaching |
Once you can manage 30 seconds within minimal / no pain then try to challenge your balance by closing eyes or standing on a pillow / cushion.
The next progression is to start reaching out of your base of support. A good way of doing this is by slowly reaching out in front of you as far as you can before slowly returning to the start position. When you can do this proficiently, aim for 2 sets of 10-15 reps. Again, it's OK to use your insoles if you need to.
Exercise 3 - Progressive Loading
These exercises are the important ones as they aim to work the muscle/tendon functionally. The role of the tibialis posterior tendon is to support and maintain the medial arch during the ‘toe off’ phase of gait. You can do this by using the ‘heel raise’ action in varying degrees of difficulty as shown below.
The first exercise is done in sitting but uses a weight to add resistance to the tendon. As shown below, use a dumbbell or even a bag of shopping over your knee. You should use enough weight so that you feel a moderate degree of effort after 3 sets of 15 repetitions.
 |
| Heel Raise in sitting with weight resistance |
All these exercises should be done slowly, particularly the lowering back down part. This works the tendon eccentrically, a type of exercises which researchers think is more effective for tendon rehabilitation.
The next progression is done with both feet on the floor. The aim is to go up on your tip toes while squeezing the ball gently between your heels. Try with your weight distributed 50:50 between each foot. You can adjust this ratio to suit your symptoms and to progress.
 |
| Heel raises within a tennis ball |
Again, make sure you go up slowly and then drop back down even slower. Aim to increase the sets and reps slowly until you can manage 3 sets of 15.
Once you can do this exercise with about 80-90% of your weight through your affected foot, it’s time to try a single leg heel raise. This essentially involves going up onto your tip toes on just your affected foot.
 |
| Single leg heel raise |
This is a more difficult exercise. Try it first on your good leg and see how many you can do before your muscles get tired over 3 sets. Whatever you can manage on your good leg should be the target for your affected leg. This might be just 3 sets of 1 rep or it might be 3 sets of 15 reps. It will depend on your background level of strength and fitness. Aim to slowly progress over the weeks until you reach your target.
 |
| Single leg heel raise with bent knee |
Another progression is to do the exercise with your toes on a step so your heel lowers down below your toes (see below).
 |
| Single heel raise using a block under the toes |
If you are an athlete, a dancer or higher level runner then you could also try some single leg hopping in various formats. A good way to start is to imagine you are stood in the middle of a clock face. Then hop out to the 1 O’Clock position before hopping back to the middle. Then go right round the clock face for the other numbers in the same way. Increase the distances from centre to outside of the clock face to progress.
 |
| Single leg hopping drill |
Hopping drills can then involve different heights eg. hopping up/down steps of varying height or adding in turns and twists. Progress by increasing speed.
Return to Function
At some point along the exercise journey you will want to start running again or increasing your running / walking distances. The time to try this will different for everyone but if you can progress the exercises above to the point where you are doing single leg heel raises equally on both feet with no / minimal pain then its OK to start. Just ensure that you progress very slowly and remember that pushing your distances too aggressively is what caused your PTTD in the first place. Be prepared to back off and rest a bit longer, or reduce your distances again if the pain starts increasing towards the red zone.
Insoles
If you have reasonable medial arch and your tendon now seems to be working normally (you have no pain when walking/running and can do a single leg heel raise) then you can probably stop using the insoles and just use good well fitted shoes. But if you have a flat foot or/and your tendon is chronically dysfunctional, then you might need to use arch support insoles for the long term. I would advise seeing a podiatrist to ensure your insoles are suitable for your individual foot.
Stretches
There is no good evidence to support the use of stretches for PTTD but, if you have stiff ankles or very tight Achilles tendons / calf muscles then an additional stretching programme may help you. See the video below which described a simple stretching regime.
__________________________________________________________________________
This article provides general information related to various medical conditions and their treatment. It is intended for informational purposes only. It is not a substitute for professional advice, diagnosis or treatment provided by a doctor or other qualified health care professional. The information provided does not constitute personal advice or guarantee of outcome and should not be used to diagnose yourself or others. You should never ignore advice provided by a health care professional because of something you have seen or read on this website. You should always consult a doctor or other qualified health care professional for personal medical advice.

