Pisotriquetral Wrist Joint Pain

Pisotriquetral Joint Pain: A Rare but Often Missed Cause of Wrist Pain

Wrist pain is common — but some causes are so rare that they often go undiagnosed. If you’re experiencing pain and sometimes a grinding or clicking sensation on the palm side of your wrist, just over a small bony bump on the little finger side, you might be one of the few people affected by pisotriquetral joint pain.

So, what exactly is the pisotriquetral joint? And what can go wrong with it? Let’s take a closer look.

You can also see this information in video format below.


What Is the Pisotriquetral Joint?

The pisotriquetral joint is formed by two of the eight small bones in the wrist: the pisiform and the triquetral. These bones sit on the ulnar side (the little finger side) of your wrist. The pisiform is a small, pea-shaped bone (its name actually comes from the Latin word pisum, meaning “pea”) that you can feel on the palm side of your wrist — it feels like a small marble under the skin.

The pisiform rests against the triquetral bone, forming the pisotriquetral joint — a small but important connection in wrist mechanics.


What Does This Joint Do?

The pisiform serves as the attachment point for a key muscle: the flexor carpi ulnaris (FCU). This muscle helps flex your wrist and its tendon uses the pisiform as a fulcrum — a bit like the kneecap works for your thigh muscles. By re-angling the tendon’s pull, the pisiform helps your wrist to flex more efficiently.


What Can Go Wrong With It?

There are two main problems that can affect the pisotriquetral joint:

1. Osteoarthritis (Wear and Tear)

Just like any other synovial joint, the cartilage surface between the pisiform and triquetral bones can wear down over time. This leads to osteoarthritis, where the joint surfaces become rough and painful. People often describe a grating or grinding sensation with wrist movement.

2. Instability (Ligament Injury)

Sometimes, after an injury such as a fall, the ligaments holding the pisiform in place can be torn or overstretched. This causes the pisiform to become unstable, wobbling around under the pull of the FCU tendon. This instability can feel like something’s shifting or clicking in your wrist and, if left untreated, can eventually lead to arthritis.


What Are the Symptoms?

People with pisotriquetral joint problems often report:

  • Localised pain on the palm side of the wrist

  • Discomfort when flexing the wrist or leaning on the hand (e.g. doing push-ups or getting up from a chair)

  • A feeling of movement or instability in the wrist

  • Occasionally a grinding or popping sensation


How Is It Diagnosed?

๐Ÿงช Clinical Testing – The Pisotriquetral Grind Test

This is a hands-on test carried out by a clinician:

  • The pisiform is pinched between the thumb and finger.

  • The wrist is flexed to relax the FCU tendon.

  • The pisiform is gently moved side-to-side and pressed down toward the triquetral.

  • Reproduction of pain or a grinding sensation is considered a positive test.

  • It’s often compared to the other wrist to assess instability.

๐Ÿ–ผ️ Imaging

  • X-ray is often used to identify osteoarthritis, showing rough or worn joint surfaces.

  • If instability is suspected, an MRI or MR arthrogram is more useful, as it can show the condition of the supporting ligaments.

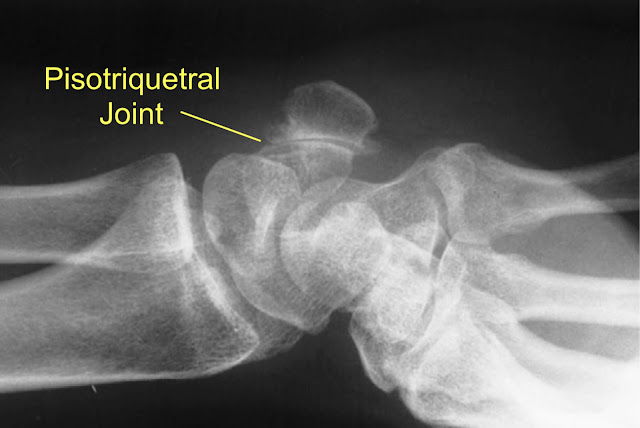
    An X-Ray showing Arthritis of the Pisotriquetral Joint


How Is It Treated?

๐Ÿฉน For Acute Injury or Instability

  • Immobilisation in a wrist splint for 6 weeks allows ligaments to heal.

  • More severe injuries may require a cast and orthopaedic care.

  • Anti-inflammatory medication (tablets or gel) can help ease pain.

๐Ÿ’Š For Osteoarthritis

  • Splints and anti-inflammatories can settle flare-ups.

  • Avoiding aggravating activities (e.g. racket sports, painting, heavy wrist use) is often helpful.

๐Ÿ’‰ Corticosteroid Injection

  • If symptoms persist, a steroid injection into the joint can significantly reduce inflammation and pain.

  • For some, this may be a long-term solution or even a permanent fix — especially if you avoid repeat aggravation.

๐Ÿ› ️ Surgical Options


Summary: Should You Be Concerned?

Pisotriquetral joint pain is rare but real — and it’s often missed or misdiagnosed. If you’ve had ongoing wrist pain on the ulnar side of your wrist, particularly with flexion or pressure, and especially after a fall or injury, this could be the root of the issue.

The good news? Once diagnosed, it’s usually very treatable — often with splinting or injection, and occasionally with surgery.

Need Support?

If you think this might be your problem, speak to a physiotherapist or GP with experience in wrist conditions. Early diagnosis can save months (or years) of confusion and discomfort.

_____________________________________________________________________________

This article provides general information related to various medical conditions and their treatment. It is intended for informational purposes only and  not a substitute for professional advice, diagnosis or treatment provided by a doctor or other qualified health care professional. The information provided does not constitute personal advice or guarantee of outcome and should not be used to diagnose yourself or others. You should never ignore advice provided by a health care professional because of something you have seen or read on this website. You should always consult a doctor or other qualified health care professional for personal medical advice. 

This website uses affiliate links for certain products that may be illustrated in the articles. When you use one of these links to purchase a product, the site receives a small commission at no extra cost to yourself. This helps support the running costs of the website and YouTube channel.

GTPS

A Comprehensive Guide to Greater Trochanteric Pain Syndrome (GTPS)

If you're dealing with a persistent, aching pain on the outside of your hip that worsens when you lie on your side, walk, or climb stairs, you may have a very common condition called Greater Trochanteric Pain Syndrome (GTPS), which is also known as trochanteric bursitis, gluteal tendonopathy or simply lateral hip pain. It's a condition which can significantly interfere with your daily life.

This guide will walk you through what GTPS is, its causes and symptoms, and most importantly, the effective, evidence-based strategies you can use to manage and treat it, from simple lifestyle changes to a comprehensive exercise programme and advanced medical interventions.

The information is also presented in video format below.

What is GTPS? It's Not What we used to Think

For many years, this type of hip pain was blamed on "trochanteric bursitis"—inflammation of a small fluid-filled sac (the bursa) on the outer hip. However, we now know from modern imaging studies like ultrasound and MRI that the bursa is rarely the main issue.

The true culprit in the vast majority of cases is a problem with the gluteal tendons, specifically the tendons of the gluteus medius and gluteus minimus muscles. These tendons act like strong ropes, attaching your powerful buttock muscles to the bony point on the outside of your hip (the greater trochanter). When these tendons are repeatedly overloaded, they can develop small, degenerative tears and fraying, much like a rope that has been strained too often. Therefore, GTPS is best understood as a gluteal tendinopathy—an overuse condition of the gluteal tendons.


Recognising the Symptoms

GTPS is characterised by pain felt on the outer side of the hip, directly over the bony bump of the greater trochanter. Key symptoms include:

  • A deep, nagging ache on the outside of the hip.
  • Pain that is significantly worse at night, especially when lying on the affected side.
  • Pain that is triggered by activities like walking, climbing stairs, or standing up after being seated.
  • Tenderness to the touch when pressing on the bony point of the outer hip.
  • Pain that occasionally radiates down the side of the thigh but rarely travels past the knee.

While symptoms can sometimes begin after a fall or direct blow to the hip, they most often develop gradually over time with no obvious injury.

How is GTPS Diagnosed?

A diagnosis is typically made based on your symptoms and a physical examination. The classic sign is tenderness directly over the greater trochanter. While imaging like an ultrasound or MRI isn't always necessary, it can be used to confirm the diagnosis by assessing the condition of the gluteal tendons and ruling out other issues.


It's important to distinguish GTPS from other conditions with overlapping symptoms:

  • Hip Arthritis: Pain from arthritis is usually felt deep in the groin or sometimes deep in the buttock, whereas GTPS pain is on the outer side of the hip.
  • Sciatica: This typically involves lower back pain and pain that radiates below the knee into the calf or foot, often accompanied by pins and needles or numbness, which are not features of GTPS.

What Causes GTPS?

GTPS is fundamentally an overuse injury that occurs when the gluteal muscles and their tendons are not strong enough to handle the demands placed upon them.

While it can affect active people who increase their training too quickly, it is most often caused by a general weakness in the gluteal muscles. The primary risk factors are:

  • A Sedentary Lifestyle: Prolonged sitting leads to weak and deconditioned gluteal muscles.
  • Being Female: Women are more susceptible due to a wider pelvis, which places greater compressive forces on the gluteal tendons. Hormonal changes, particularly during and after menopause, can also affect tendon health.
  • Being Overweight: Excess body weight significantly increases the load on the hip tendons with every step.
  • A Sudden Increase in Activity: The classic story is someone who is generally sedentary but then undertakes a long charity walk or a new fitness class, overwhelming their unprepared tendons.

Your Treatment Plan: A Step-by-Step Guide to Recovery

The great news is that around 90% of people with GTPS can recover fully without injections or surgery. The key lies in a two-pronged approach: first, calming the irritated tendon down, and second, gradually building its strength and resilience.

Step 1: Reduce the Load and Settle the Pain

Before you can strengthen the tendon, you need to stop aggravating it. The goal is to reduce your pain to a manageable level (around a 5/10 or less).

  • Avoid Crossing Your Legs: This position squashes the irritated tendon against the hip bone. Making a conscious effort to stop is a quick win.
  • Adjust Your Sleeping Position: Avoid sleeping directly on the painful side. Sleep on your back or on your other side with a pillow placed firmly between your knees to prevent your top leg from falling across and compressing the tendon. A Contoured Knee Pillow can make this easier.
  • Temporarily Reduce Activity: Cut back on long walks, running, or hill climbing until symptoms improve. This is a strategic rest, not complete bed rest.
  • Walk Mindfully: Try to avoid limping, as this can lead to further weakness. If pain forces you to limp, use a walking stick or cane in the opposite hand to offload the hip.
  • Use Ice or Heat: An ice pack on the painful spot for 20 minutes can help reduce pain. A heat pack on your buttock muscles can help ease muscle tension, especially after exercise.

Step 2: The Gluteal Strengthening Programme

This is the single most important part of your recovery. A consistent and progressive exercise programme will increase your tendon's capacity to handle load, making it resilient to future flare-ups. Perform these exercises for 15-20 minutes daily, progressing slowly as your pain allows.

You can see the full programme being demonstrated in the video below.

Basic Strengthening Exercises

  1. The Clamshell: Lie on your good side with your painful hip uppermost, knees bent, and ankles together. Keeping your pelvis still, slowly lift your top knee away from your bottom knee. Hold for 3 seconds. Aim for 15-20 repetitions. To progress, add a Resistance Band around your knees.
  2. Standing Hip Abduction (Isometric): Stand side-on to a wall, about a foot away. Push the ankle of your affected leg into the wall and hold the contraction for 5 seconds. Repeat 10 times.
  3. Side Plank: Lie on your side, supporting your body on your elbow and forearm, keeping a straight line from your head to your feet. Hold for 15-30 seconds. Repeat 2-3 times on each side.

Functional Strengthening Exercises

  1. The Bridge: Lie on your back with your knees bent. Slowly lift your pelvis off the floor, squeezing your glutes. Hold for 5 seconds. Aim for 15-20 reps. To progress, perform a slow "stepping" motion while holding the bridge, keeping your pelvis level.
  2. The Squat: This is a vital exercise. Stand with your feet shoulder-width apart and perform a shallow squat, keeping your back straight and feet flat. Use a chair for support if needed. Start with 2 sets of 10 and build up. Progress by adding a resistance band around your knees, keeping tension on it throughout the movement.
  3. Standing Hip Abduction (with band): With a Resistance Band around your ankles or knees, stand on your good leg and move your affected leg out to the side against the resistance. Perform in a slow, controlled manner for 10-15 reps.

Dynamic and Balance Exercises

  1. Single Leg Balance: This is another crucial exercise. Simply practice balancing on your affected leg, using a wall for support initially. Aim to hold for 30 seconds. To progress, perform a slow "hip hinge," leaning your torso forward while balancing, even reaching to touch the floor if you can.
  2. Step-Ups: Use a bottom stair. Step up and down slowly and with control, first leading with one leg for 15 reps, then the other. You can also perform side step-ups.

Long-Term Prevention: Weight Management and Your Workstation

  • Weight Loss: If you are overweight, even a small reduction in body weight can dramatically decrease the strain on your gluteal tendons. This is often the critical factor for patients who fail to improve.
  • Riser Desk
    Rethink Your Desk: If you have a desk job, prolonged sitting is your enemy. Consider a standing desk converter or a full riser desk. Gradually increasing the time you spend standing at work can strengthen your leg muscles, improve your overall health, and reduce your risk of recurrence.

When to Seek Further Help: Interventional Treatments

If you have diligently followed the self-help and exercise plan for 3-6 months with little improvement, you are in the unlucky 10%. At this point, it is reasonable to discuss further options with a healthcare professional.

  • Corticosteroid Injection: An injection can provide powerful short-term pain relief. Its main benefit is to reduce pain enough to allow you to engage more effectively with your exercise programme. It is not a long-term cure, and repeated injections may weaken the tendon.
  • Shockwave Therapy: This non-invasive treatment uses high-energy sound waves to stimulate a healing response in the tendon. It typically involves a course of 3-6 weekly sessions.
  • Needle Fenestration/PRP Injections: These procedures involve using a needle (with or without injecting your own concentrated blood platelets, or PRP) to create micro-trauma in the tendon, aiming to trigger a new healing process. They are always performed under ultrasound guidance.
  • Radiofrequency Ablation: A newer pain management technique where a specialised needle is used to heat and "burn away" the small sensory nerves that transmit pain signals from the tendon.
  • Surgery: Surgery is a last resort and is not routinely performed for GTPS. The evidence for its effectiveness is limited, and most hip surgeons are reluctant to offer it.

Conclusion: Patience and Persistence Are Key

Greater Trochanteric Pain Syndrome can be a frustrating and painful condition, but it is highly treatable. Recovery is not instant; it requires a commitment to changing your habits and consistently performing your exercises. By reducing the aggravating loads and systematically rebuilding the strength of your gluteal tendons, you can get back to walking, sleeping, and living your life without that nagging pain in your hip.

_____________________________________________________________________________

This article provides general information related to various medical conditions and their treatment. It is intended for informational purposes only and  not a substitute for professional advice, diagnosis or treatment provided by a doctor or other qualified health care professional. The information provided does not constitute personal advice or guarantee of outcome and should not be used to diagnose yourself or others. You should never ignore advice provided by a health care professional because of something you have seen or read on this website. You should always consult a doctor or other qualified health care professional for personal medical advice. 

This website uses affiliate links for certain products that may be illustrated in the articles. When you use one of these links to purchase a product, the site receives a small commission at no extra cost to yourself. This helps support the running costs of the website and YouTube channel.

Frozen Shoulder

Frozen Shoulder : The Complete Guide to Pain Relief and Movement Recovery

If you've developed a painful, stiff shoulder that has stubbornly lost its normal range of motion, you may be experiencing a condition known as Frozen Shoulder. This guide is designed to help you understand what's happening in your shoulder, the typical journey of the condition, and most importantly, what you can do to manage the pain and reclaim your movement. The information is also presented in video format below.


What Exactly Is Frozen Shoulder?

Frozen shoulder is a condition where the shoulder joint becomes progressively painful and stiff. The main tissue affected is the joint capsule, which is a sleeve of connective tissue that surrounds the shoulder joint and helps keep everything in place. In a normal shoulder, the capsule is loose and flexible in order to allow the huge range of movement available in the shoulder. But in frozen shoulder the capsule becomes inflamed and angry and then contracts and adheses itself to the underlying joint, almost like shrink wrap.  So this is where it gets its medical name of adhesive capsulitis


The Three Stages of Frozen Shoulder

Frozen shoulder will typically progress through 3 distinct stages. Understanding the timeline of the condition is crucial because treatment is tailored to the specific stage you are in. 

Stage 1: The 'Freezing' Stage (The Painful Phase) The defining symptom of this initial stage is pain. The shoulder becomes increasingly painful with movement, and the pain can be severe, especially at night, often disrupting sleep. This intense pain is due to active inflammation in the joint capsule. While the name "frozen shoulder" might sound minor, the pain during this phase can be one of the most significant in musculoskeletal medicine. This stage can last anywhere from one to six months.

Stage 2: The 'Frozen' Stage (The Stiff Phase) During this stage, the intense pain begins to subside, which is often a significant relief. However, as the inflammation settles, the capsule becomes fibrotic and tight, leading to profound stiffness. You'll likely find it difficult to lift your arm away from your body, raise it overhead, or reach behind your back. Everyday tasks like combing your hair, fastening a bra, or tucking in a shirt can become challenging. This is typically the longest stage, lasting an average of six to twelve months.

Stage 3: The 'Thawing' Stage (The Recovery Phase) Finally, in the thawing stage, the stiffness gradually begins to resolve, and your range of motion starts to return. While this phase can take several months (or longer), most people experience a significant, if not complete, recovery over time. 

The entire journey of a frozen shoulder can take between one and three years. The good news is that it is a self-limiting condition for most, meaning it will eventually get better.

Why Did I Get It? Understanding the Causes and Risks

While the exact trigger for frozen shoulder is often unclear, several factors are known to increase your risk:

  • Age: It most commonly affects individuals between 40 and 60 years old.
  • Sex: Women are slightly more likely to develop frozen shoulder than men.
  • Medical Conditions: People with diabetes or thyroid disorders have a significantly higher risk. The link is particularly strong with poorly controlled diabetes.
  • Immobility: The condition can sometimes be triggered by a shoulder injury or surgery, especially if the arm has been immobilised for a long period.

Crucially, frozen shoulder is a medical condition, not something you’ve caused through poor posture, sleeping awkwardly, or lifting a heavy object. It is usually not your fault. It's also worth noting that if you've had a frozen shoulder on one side, there is a roughly 20% chance of developing it in the other shoulder within five years.

How is Frozen Shoulder Diagnosed?

A diagnosis of frozen shoulder is usually "clinical," meaning it's based on your specific symptoms and a physical examination. An X-ray might be ordered to rule out other problems that can mimic a frozen shoulder, such as arthritis or a fracture, but the X-ray itself will typically be normal in a case of frozen shoulder.

The most telling clinical sign is a significant loss of passive external rotation. This is the outward rotating movement of your shoulder. You can check this by tucking your elbows into your sides, bending them to 90 degrees, and then rotating your forearms outwards. An unaffected shoulder can typically rotate 70-90 degrees, whereas a frozen shoulder will be severely restricted, often moving only a few degrees.

A Typical Right Sided Frozen Shoulder

What Are My Treatment Options?

Treatment focuses on two main goals: managing pain and then improving movement. The right approach depends on your stage. For some with mild symptoms, simply understanding the condition and its natural history is enough reassurance to let time be the main healer. For those with more severe symptoms, a more active approach is needed.

Managing the 'Freezing' (Painful) Stage

If you are in the early, painful stage, the priority is pain relief.

  1. Pain Medication: Over-the-counter painkillers like paracetamol and anti-inflammatories like ibuprofen can be very effective. The key is to take them regularly as directed on the packet (e.g., every 4-6 hours), not just "as needed." This allows a therapeutic level to build up in your system. Always consult a pharmacist or doctor before starting new medication.
  2. Heat or Ice: Experiment with both Heat Packs and Ice Packs to see which provides more relief. There is no right or wrong choice; it’s about personal preference.
  3. Cortisone Injection: If your pain is severe and robbing you of sleep, a cortisone injection is often the most effective treatment. It delivers a powerful anti-inflammatory directly into the joint to "put the fire out." This won't fix the stiffness, but it can dramatically reduce pain. If possible, an injection performed under ultrasound guidance is preferable for accuracy.

Managing the Frozen Stage

Once the severe pain is under control, the focus shifts to restoring movement. The principle is "movement is medicine," but it's vital to start gently and not push aggressively into pain. Aim to keep any discomfort during exercises below a 4 or 5 on a 10-point pain scale.

Choose a few exercises that feel right for your stage and aim to do them consistently.

The following exercises can also be seen demonstrated in the video below.

Gentle Mobility Exercises (For early stages with some pain)

  • Pendular Swings: Lean forward, supporting yourself with your good arm on a table. Let your affected arm hang down and gently swing it forwards and backwards, side to side, and in small circles, like a pendulum. Using a small weight (e.g., a 1kg dumbbell or a bottle of water) can help relax the shoulder.
  • Assisted Elevation: Use your good arm to help lift your affected arm. You can do this by clasping your hands together or by using a stick (like a broom handle) and pushing the affected arm up in front of you.
  • Assisted External Rotation: Keep your elbow tucked into your side at a 90-degree angle. Hold a stick and use your good hand to gently push the hand of your affected side outwards, stretching the shoulder into rotation.
  • Table Slides: Sit at a table and place the hand of your affected arm on a cloth. Gently slide your hand forwards, sideways, and in circles.
  • Pulleys: Use a pulley system (amazon link here) over the top of a door to help elevate your shoulder as high as possible with minimal pain.

More Intensive Stretches (When pain is minimal and stiffness is the main issue)

  • Wall Walks: Stand facing a wall and "walk" your fingers up as high as you can without significant pain. Hold for a few seconds, then slide back down. You can also do this standing sideways to the wall to work on abduction (lifting the arm out to the side).
  • Doorway Stretch: Stand in a doorway with your elbow bent at 90 degrees and your palm on the doorframe. Keep your elbow tucked in and slowly turn your body away from your arm to stretch the front of the shoulder.
  • Hand Behind Back Stretch: Reach your affected hand behind your back as far as is comfortable. Use your good hand to gently pull it further up your back, or use a towel draped over your good shoulder to assist the stretch.

Strengthening Exercises (For the 'Thawing' stage as movement returns)

  • Resisted External Rotation: With your elbow at your side, use a Resistance Band to add a challenge to the outward rotation movement.
  • Wall Press-ups: Stand facing a wall and perform a press-up motion. To make it harder, move your feet further from the wall.

What if Nothing is Working?

For a small number of people, frozen shoulder can be incredibly stubborn. If your symptoms haven't improved after a significant amount of time (e.g., 3-6 months of severe pain or 2-3 years of stiffness), there are more advanced options:

  • Hydrodistention (or Hydrodilatation): In this procedure, a large volume of sterile fluid is injected under pressure into the joint capsule to stretch it from the inside out. It is minimally invasive and can be very effective for persistent stiffness.
  • Surgery (Arthroscopic Capsular Release): As a last resort, a surgeon can perform keyhole surgery to carefully cut the tightened sections of the capsule, physically freeing the joint. This is generally preferred over the older technique of "Manipulation Under Anaesthesia (MUA)," which involved forcibly moving the shoulder and carried a higher risk of damaging surrounding tissues.

A Special Note for People with Diabetes

If you have diabetes, managing your frozen shoulder requires an extra layer of diligence. A diabetic frozen shoulder can be more severe and often takes twice as long to get better. Recovery is directly linked to blood sugar control. If your HbA1c levels are high, prioritising your diabetes management is the single most important thing you can do. Other treatments are unlikely to be effective until your blood sugar is under good control.

Final Takeaways

  • Be Patient: Frozen shoulder is a marathon, not a sprint. It almost always gets better, but it takes time.
  • Find a Balance: Keep the shoulder moving within your pain limits. Don't push through severe pain, but don't stop using the arm completely.
  • Manage Pain First: In the early stages, focus on pain relief. An injection can be a game-changer for severe, sleep-disturbing pain.
  • Exercise Consistently: Gentle, regular stretching and strengthening will make a difference, especially in the later stages.
  • Seek Help: If you are struggling to cope or your symptoms are not improving as expected, consult a physiotherapist or your doctor to discuss your options.

_____________________________________________________________________________

This article provides general information related to various medical conditions and their treatment. It is intended for informational purposes only and  not a substitute for professional advice, diagnosis or treatment provided by a doctor or other qualified health care professional. The information provided does not constitute personal advice or guarantee of outcome and should not be used to diagnose yourself or others. You should never ignore advice provided by a health care professional because of something you have seen or read on this website. You should always consult a doctor or other qualified health care professional for personal medical advice. 

This website uses affiliate links for certain products that may be illustrated in the articles. When you use one of these links to purchase a product, the site receives a small commission at no extra cost to yourself. This helps support the running costs of the website and YouTube channel.

Dupuytren's Disease

 This article is about Dupuytren's Disease of the Hand and Dupuytren's Contracture. It is divided up into sections which look at the condition and its symptoms, the causes and the treatment options. The information is also presented in video format below.

What is Dupuytren's Disease ?

Dupuytren's Disease is a type of fibrous dysplasia. Fibrous refers to the type of tissue affected, in this case its something called the Palmar Fascia. We’ll get into the details of what that is later. Dysplasia comes from the Ancient Greek with 'dys' meaning ‘abnormal' and ‘plasia’ meaning 'growth'. So Dupuytren's disease is an Abnormal Growth of the Palmar Fascia


The tissues that make up the palm occur in layers. Deepest are the bones of the hand, then above that we have the working parts such as the tendons, muscles and nerves. Then we then have the palmar fascia and finally the layers of fat and skin. 


In normal hands the palmar fascia is a thin but very strong sheet of fibrous tissue that binds down the working parts of the hand and helps create the typical bowl shape of the palm. We don’t have this layer on the back of hand which is why the skin is so freely mobile here as opposed to palm, which is firmer and with more structure. 


The Palmar Fascia shapes the Palm

The symptoms of Dupuytren's disease are a thickening of the palmar fascia. This can occur anywhere in the palm and the base of the fingers but its much more common over the little finger side, usually near to the base of the little and ring fingers


Dupuytren's tissue can feel like small firm nodules which can eventually become visible. Sometimes it cause a pinch in the skin which we call a Dupuytren's Pit. Most commonly though it occurs in a Dupuytren's Band or Cord which often gets mistaken for a tight tendon but is in fact nothing to do with the tendons which are usually safe and sound underneath these bands in the deep layers of the palm. 

A Dupuytren's Nodule
A Dupuytren's Pit
A Dupuytren's Band

Sometimes the condition will stop with some nodules or bands that don’t cause any problems, but sometimes the Dupuytren's Tissue will start to shrink along its length causing the fingers to bend. This usually occurs very slowly, often over years, but eventually it can lead to bent fingers. At this stage it is referred to as a Dupuytren's Contracture. The ring finger, the little finger and the middle finger are most commonly affected. The condition can be painful in the early stages but any pain usually settles down over a few months, and in most people it is completely painless.


A Dupytren's Contracture of the Ring Finger

In summary, everyone with Dupuytren's Disease will have nodules, bands or just generally thickened palmar tissue. Some people will then go on to develop the bent fingers associated with a Dupuytren's Contracture.


What is the Cause ?


Dupuyten's disease is thought to be an inherited condition although the exact gene is yet to be found. Some researchers think it was derived from the vikings, as it’s much more common in countries where the vikings travelled to, and is especially common in the Scandinavian countries. As a result, it has an alternative name of Viking Hand


Viking Hand


For a genetic condition its behaviour is quite unusual. Most inherited conditions show their symptoms in early life, often at birth, but not so with Dupuytren's. The symptoms don’t tend to occur until much later in life, often over the age of 60


So if you have Dupuytren's disease then it is thought that you have inherited it through one or both parents. This might be news to you but there are a few reasons why this might be so. Firstly your parent might have hidden it. Keeping a closed fist will disguise the condition from onlookers, and people of an older generation may have chosen not to tell anyone. Or they might have had the condition but thought it was something else. So called ‘segs’ or callouses in the palm are often the early signs of Dupuyten's Disease. The other scenario is that your parent might have passed away before the condition would have shown its symptoms. 


As a rule, the later in life it presents, the less aggressive it tends to be. So if you first notice symptoms in your 80’s then chances are it will never progress beyond some small lumps in the palm. However, if it presents in your 30’s then it’s much more likely to cause bent fingers and need treatment. 


Treatment of Dupuytren's Disease without Contracture (Straight Fingers)


If you have the lumps in the palm or fingers but your fingers are straight, then you usually don’t need any treatment. Cutting the lumps out surgically at this stage will be pointless, because they are part of your genetics and will just grow back. About the only thing you can do at this early stage is to keep the palmar skin healthy with regular use of hand cream and do some basic daily finger stretches like the prayer stretch shown below.


The Prayer Stretch

The exception to this rule is if you are very young (under 40) or if the condition is persistently painful. 


If persistent pain is a problem for you then a cortisone injection into the painful tissue can be helpful. It will not dissolve the nodules or bands, or effect their appearance in any way but it can help with pain. 


If you are much younger then normal when the symptoms first develop (under 40) then is it likely that the condition be be more aggressive and lead to finger contractures which require multiple surgeries. In this case there is the option of prophylactic treatment. Using targeted radiotherapy (ionising radiation treatment) can slow the progression of the disease and potentially prevent or slow down the development of contractures. Once the fingers have become bent though, this type of treatment is less effective and other treatments aimed at straightening the fingers are required. If you want to know more information about Radiotherapy for Dupuytrens's Disease then see the video below.


Treatment of Dupuytren's Contacture (Bent Fingers)


Treatment usually only becomes necessary when the fingers start bending do the degree where they are causing problems with hand function, usually when you can no longer get your hand in your pocket or you're poking your finger in your eye when washing your face. This normally occurs when the fingers are bent to about 20 degrees. A good test is the try to get your hand flat on a table. If you can’t do this, and the gap is big enough to easily slide a pencil under, then it might be time to see a hand surgeon.


The Pencil Test


The treatment options depend on where the finger bend occurs. If it occurs at the knuckle joint then there is the option of needle fascioteomy. This is a procedure where the surgeon will numb your hand and then use the tip of a needle like a scalpel to carefully cut through the dupuytrens band. It’s done as a simple out-patient procedure and can be very effective if your finger bend isn’t too severe. 


Needle Fasciotomy


Another option is a collagenase injection. This is a drug that is injected into the tight Dupuyren's tissue. It targets the specific collagen type affected by Dupuytren's Disease and dissolves it. Again, it’s done as a simple out patient procedure usually over a few days. The first day, you have the injection which breaks down the band over 24-48 hours. You go back in a day or 2 and the surgeon will stretch the finger out, hopefully until its straight again. You then have to wear a splint for a few weeks to keep the finger straight. It works best for bends at either the knuckle joint or the finger joint but usually not both together. At the time this article was written in 2025, due to supply issues, collagenase injections are currently not available in Europe or Australia.


If you have a bend in both of these joints then usually, the only option is surgery. The procedure is called a palmer fasciectomy and it can be done under local or general anaesthesia depending on the degree of finger bend and the numbers of fingers involved. The surgeon carefully cuts though the bands which are causing the finger to be bent. This will leave a scar and you will usually need to wear a splint for a few months afterwards in order to get the best result. 


Palmer Fasciectomy - picture from teachmesurgery.com

Because this is a genetic condition, the fingers can become bent again after any of these procedures, but hopefully this won’t be for many years. If you are younger patient and the conditions is very aggressive then the surgeon has the option of performing a dermo-fasciectomy. This is where the surgeon performs the normal fasciectomy operation but then take a small skin graft, usually from a hairless region of the  forearm, and places it over the palm. This seems to slow the recurrence rate down considerably but it is a more involved procedure and will leave you with an area of skin over the palm that looks very different.


The scar from a Dermo-fasciectomy procedure


With all of the procedures, its best not to leave it too late to see a hand surgeon. This picture below shows the ideal time as the result is likely to be fairly good. 


A Mild Dupuytren's Contracture of Ring and Little Fingers


However, if you leave it to get to stage below then the surgeon is going to have a much more difficult job and it’s unlikely they will be able to get the finger fully straight. 


Severe Dupuytren's Contracture

Key Points

1) Dupuytren's Disease is a harmless inherited condition.

2) The condition can cause lumps and bumps in the palm and fingers. 

3) The condition only needs treatment if :-

    a) You are under 40 when symptoms first occur.

    b) You have persistent pain (this is rare).

    c) You have bent fingers (Dupuytren's Contracture) which are causing functional problems.

_____________________________________________________________________________

This article provides general information related to various medical conditions and their treatment. It is intended for informational purposes only and  not a substitute for professional advice, diagnosis or treatment provided by a doctor or other qualified health care professional. The information provided does not constitute personal advice or guarantee of outcome and should not be used to diagnose yourself or others. You should never ignore advice provided by a health care professional because of something you have seen or read on this website. You should always consult a doctor or other qualified health care professional for personal medical advice. 

This website uses affiliate links for certain products that may be illustrated in the articles. When you use one of these links to purchase a product, the site receives a small commission at no extra cost to yourself. This helps support the running costs of the website and YouTube channel.